Creating an initial load
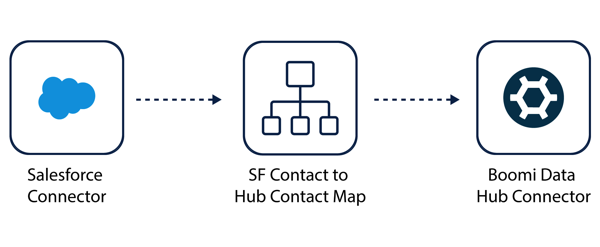
This process uses the new Boomi Data Hub connector, which is necessary for every new data source connected to Data Hub.The integration starts with a connector like Salesforce, maps the data to the data model in Data Hub, and then sends the data into Data Hub. With the initial load, you are taking a data source and sending that data into Data Hub.
Prerequisites
Create and deploy a contact model and add a runtime cloud.
Enabling initial load
- In Repositories > appropriate repository such Customer > appropriate model such as contact > Sources, there are your sources such as SFDC (source ID). This is set to contribute and accept data. The grey dot means you have not initially loaded data from Salesforce.
- Click the gear icon to open the drop-down.
- Click Enable Initial Load.
Salesforce Connector Step
- To create the integration, open the Integration service and navigate to the Build tab. In the sidebar, click the plus icon. Select Process and click Create.
- In the Start Step screen, the first step you need to create is the Salesforce connector. For Display Name, type in an appropriate name like Salesforce. For Connector, select Salesforce connector.
- For Connection, select an existing connection or create a connection. In this case, select Sandbox Salesforce Connection. To create a connection, click the plus icon in the connection search bar.
- Check the URL is correct. Enter your username in the User Name text box.
- Click Click to Set to enter your password in the Password. Your connection password is a combination of your Salesforce password first and second security token. For example, if my Salesforce password is “salesforcepassword” and my security token is “token1234” then my connection password is “salesforcepasswordtoken1234”.
- Click Apply. To save the connection, click Save & Close.
note
The connection is your Salesforce credentials. When you enter your credentials once, you can use this connection without having to log in again.
- Click Import Operation.
- To connect Data Hub to Salesforce, search for and select the Sandbox Salesforce Connection and click Next. Next, you want to transfer the contact object. The Object Type is Contact and the Action is Query.
note
These are the details of the API call that are going to pull the contact object from Salesforce.
- Click Next. Data Hub is pulling all of the fields from the contact object.
- Click Next.
- Click Finish.
- Click Save and Close.
Data Hub Connector Step
- You need to create the Data Hub Connector step. In the search bar, search for Boomi Data Hub. In the Connect Step screen for the Connection, click the plus icon.
- You can name the connection a name closely related to the repository, such as Data Hub Customer Connection.
- The Cloud Name is Customer since that is the repository I want to sync in Salesforce with Data Hub.
- For the Username, go to Data Hub, click the appropriate repository, such as Customer, click Configure, and click Copy on the Username. Go back to the Integration service connection tab and paste the Username.
- To find which cloud you are on for the Custom URL, go to Repositories > appropriate repository such as Customer > Configure tab, and view the URL in Base URL for API Requests. Copy the URL and paste the URL in the Custom URL field in the following format, appending /mdm to the path:
https://<base URL>/mdm/. - To set the token, go to Repositories > appropriate repository such as Customer > Configure tab, click Copy on the My Hub Authentication Token, click Click to Set, past the token, and click Apply.
- Click Save.
- Go to the New Process tab > Connector Step screen.
- To pull and update the golden records from Salesforce to Data Hub, click the Action dropdown and select Update Golden Records.
- To configure the Operation, click the plus icon in the Operation search bar.
- Here, you can rename the Operation, such as Update Contact Operation.
- Click Import Operation.
- In the Integration service, click the Connector icon to open the Connector Step screen.
- Click the edit pencil button to edit the Operation.
- Click Import Operation. Click the Runtime dropdown and select Runtime Example. In the Connection dropdown, click Data Hub Customer Connection. Click Next.
- The runtime is connecting to Data Hub to import the Data Hub models. Click the contact model. Click Next. Data Hub is looking up the data schema for the model to create a structure that includes the fields and structure for updating or creating new golden records.
- Click Finish.
- Enter your source in the Source field. In the Data Hub service, go to Sources and find the appropriate source ID under the Source ID column. Click Save & Close. The Data Hub connection is properly configured.
Map Step
- In the Connector Step screen, click OK. To map the the Salesforce database to Data Hub, you have to create a Map step.
- Click and drag the Map step onto the grid.
- At this point, drag the “>” to each appropriate step to connect the steps. You need to configure the Map step.
- Beneath the Map step, click Configure.
- Click the plus icon in the Map search bar. Name the map SF Contact to Hub Contact. In this case, the Map Source is Salesforce.
- In the Map Source, click Choose. Click the Profile search bar and find the correct profile, which is SF_Contact_QUERY_Response.
- Click OK.
- Click the Profile search bar and find the correct profile, which is SF_Contact_QUERY_Response. Click OK.
- The contact record fields are populated in the Map Source. The Map Destination is the record that receives the information, which is the model in Data Hub.
- In the Map Destination, click Choose.
- Click the Profile search bar and find the correct profile, which is Boomi Data Hub contact updateGoldenRecords Request.
- Click OK.
- Drag the Salesforce fields to the corresponding Data Hub fields. For example, the Salesforce
idshould be connected to the Data Hubid. - Create a Stop step. Click the
>icon, search for and select Stop. Click Save. - Click Save & Close.
- In the Map Step screen, click OK.
- You can test your Integration to check that the process works.
- Click Test.
- Select the appropriate runtime, which is Runtime Example in this case. Click OK.
For more information on managing records, refer to Stewardship.
